
I have a client who's automotive collection I shoot from time to time. He collects and restores vintage Volkswagen busses and pickups. All of his collection so far has been authentic restorations, so the color of the vehicle is always exactly what it was from the factory. But he had been telling me about his next project which would be "street modified", not aiming for the traditional stock look. He had no idea what different colors would look like on his vehicle and didn't want to make a mistake on an $8,000 paint job.
I said; "Really? I have a solution". He agreed to my Photoshop proposal, and I asked him to email through decent images of the car colors he wanted. He also sent me a line drawing of his vehicle, thinking I was just going to color it in. I had something way better in store!
Introduction
There are many ways to change color in Photoshop. You could use the Color Replacement tool (located under the Brush Tool) or you could use the menu item Color Replace. But none of those would give me the flexibility I needed for this project. I couldn't just pick colors at random even if he said "I want a yellow color". With automotive colors we needed an absolute that the paint shop mixing the paint would know exactly the color we wanted. With this in mind, I needed to sample actual car colors available and duplicate them. There was only one way I knew to do that, and this is the method we'll be investigating in the tutorial.
The example here relates to an automobiles, but the same technique can be used on many applications, Change the color of a client's dress, change the paint color of a house before you paint it. Just about anything you can think of.
Step 1
The main processes we are going to be using in Photoshop are: Layers, Layer Masks, Layer Blend Modes and Layer Opacity and Fill. If you aren't used to using layers and layer masks in Photoshop, it is one thing you should get familiar with. Here are two hints to begin with that are crucial with Layer Masks: Remember that "Black Reveals" (the layer below) and "White Conceals". Also remember your X key on the keyboard. That is a keyboard short cut for switching between your foreground and background color swatches. (Which should be set to Black and White)
Open your subject image you want to change the color on, In this case we are using one of his stock Volkswagen Double Cab Pickups

The first thing I need to make is a Layer mask; this allows only the parts of the image I want the new color applied to be defined. (And yes there are a million and one ways to make a layer mask and if you have a better way, use it.) I like the paint by hand method for this)
I will start by adding a new Color Fill layer, which I can do from the menu bar at Layer > New Fill Layer > Solid Color or by clicking the Black/White Cookie symbol on the Layers Palette. At this point it doesn't matter what color - just one that contrasts with your subject so you can see where you want to keep the lines. But of course this is a big solid color over your image - so how can you see where you want to paint out? Go over to your layer palette and reduce the opacity to about 50%. This will allow you to see your subject below.

Grab a large black soft edge brush and take away the major areas you don't want the new color applied to, then progressively use smaller brushes and harder tips till you get as exact a mask as you can. Hitting your X Key and switching back and forth between Black and White to correct any area you may gave gone over a line. Remember that the success of this will depend on how good a job you do of masking the image. Just like if you were painting a car, you want to mask off the chrome and not paint it.
When you are done, your mask will look something like this (I hid the background layer)

Step 2
Now it is time to apply color to the image, so go back to your layers palette and bring the opacity back to 100%

I know what you're thinking: "that looks terrible, it's just a solid color!" You're completely correct, but we'll rectify this in the next stage. Go back to your layer palette and this time to the layer blend mode and drop down the list. Different modes will work better depending on what base color car you have, but for this example we are going to try "Color Burn".

There's an immediate, obvious improvement. All the detail, reflections and shadows have come back to the image.

Step 3
Now I want to make it the color I need it to be. So I will open up the image of the car color I want to copy, in this case Corvette Atomic Orange and have that image open along side of this one.
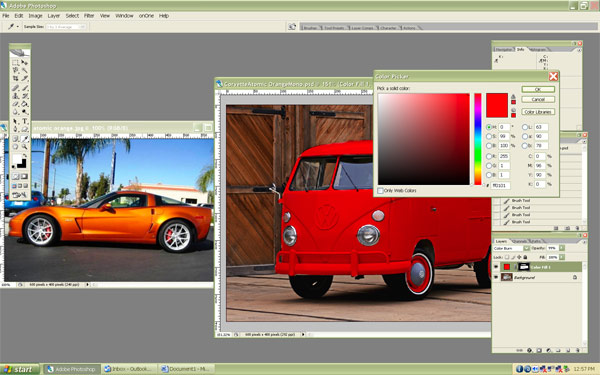
Now, with the Volkswagen shot active, on the layer palette click on the color swatch. This will bring up the color palette but will also make a color picker eyedropper available. Move that Eyedropper over to the Corvette and start sampling areas of the Corvette, You will have to try a few different areas because as we know there is not one color but actually many shades of color in an object. Keep picking until you find one area that makes the Volkswagen look like the Corvette in color.
Note: You don't have to sample a color, if you are not trying to match a color you can just open the color palette and choose any color you want

And there you have it: our previously off-white Volkswagen is now proudly painted in "Corvette Atomic Orange"!

Save your image as a .psd or .tiff and preserve the layers so that later on you can go back and change the color easily. We ended up with about 8 different color schemes. He wanted a Monotone paint scheme so the bumpers, emblems and wheels are all the same color. But more on this later.
Step 4
If you remember, we used the Color Burn blend mode which worked great in this instance with an off-white object. But as you will find out, the color underneath has a definite influence on how the color above looks. So Color Burn may work excellently with off-white or gray objects but what about other colors?
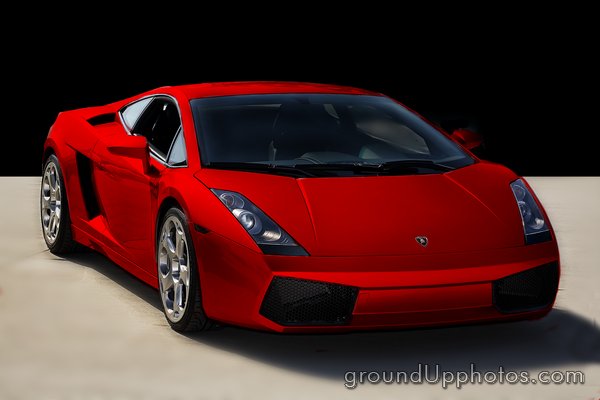
In this instance I was starting with a Red Ford GT that has a profound influence on the final color

I want to make it Saturn Safari Tan and when I sampled that color it just turned it a nice shade of Pink. I then went through all the modes and none were quite right. But "Color" mode got me into the right color tone, just about 20 shades too dark.

So I had to get creative here. What I did was add a Levels Adjustment layer (Layers > New Adjustment Layer > Levels) and duplicated the layer mask on this layer so that the adjustment only applied to the paint, I held down ctrl + alt and just dragged the mask to the layer above on the layer palette. An adjustment with the midtone slider brought the image to right where I wanted the color to be.
Hint: Using an adjustment layer will be the best way to get purer black or white as a color, otherwise you end up with just a mid-tone Gray.

When working with a Silver Car, "Multiply" mode worked great to make any color look Metallic or Candy Apple effect.
Here, I wanted the red to be a solid red not a metallic looking red, so I solved that by adding a white color layer in between the silver and the red.

The possibilities are endless, and you can experiment with some fairly shocking colors!

In this instance I took a Black Cadillac, turned it White using Linear Dodge blend mode added a Levels adjustment layer to get the white how I wanted it. I then changed the blend mode on the Levels layer to Linear Burn to achieve this Chrome look.

So as you can see, you can make this as simple or as outrageous as you want and you may have to do some experimenting to achieve the perfect adjustment. Try different blend modes, and experiment with the fill and opacity amounts till you get just what you want.
My client was very happy. Even though he had to pay for about 4 hours of edit time (always charge for edit time - don't give it away!) he knew exactly what he wanted before the restoration project started and saved himself thousands in mistaken color or accessory choices.
And what did he end up choosing? Well, not what we started with, He got rid of the Monotone, and went with a two tone with Chrome Bumpers (I added a new layer, then used Filters > Sketch > Chrome and again masked it just to the bumpers and emblem). Here is his final concept vehicle, a mockup of which he can see it a year before the vehicle will actually be completed!
Edit: After I wrote this, he changed his mind again. Good thing we didn't use real paint!
Share On


No comments:
Post a Comment